Adding and updating classes/students (using CSV)
Adding and updating classes/students (using CSV)
Article summary
Did you find this summary helpful?
Thank you for your feedback
Guidance to help you create and update students in Sparx Maths via CSV import.
This article is for schools that do not have an MIS integration.
If you have an MIS integration, your students will be automatically imported when you import classes from your MIS. See this article for more info.
If you have an MIS integration, your students will be automatically imported when you import classes from your MIS. See this article for more info.
Overview
You can use student import to:
- Import students into Sparx Maths from a CSV file
- Create classes in Sparx Maths if they don't exist yet
- Update existing students' details (for example, move them between classes or change parent email addresses)
Importing new students
You'll need to get your student data ready for import in a specific format. See our Formatting your CSV article for more information.
Here is a short video showing how to upload your completed CSV.

We will then show you a preview of your student data. You will see any errors are flagged to you which you will need to correct in your original CSV and re-upload it to continue.
Not sure where the errors are?
Check out our 'Common Errors' section in our Formatting your CSV article.
Once you're happy that your student data is correct, click on Preview Student Changes. This will show you details of any classes and students that will be created if you continue. If you're happy with the preview, click Import/Update Students.

Stay on this page.
The upload may take several minutes, do not navigate away from the page until the upload is complete.
The upload may take several minutes, do not navigate away from the page until the upload is complete.
Adding new students
To add students to your Sparx Maths site, go to Student Manager, select the correct year group and then click Add single student. You can then input all of their data. Make sure you share their username with them and don't forget to save.
 Then you can tell the student to complete the New User steps found in Setting up a new student account.
Moving a student to a new class
If you have a lot of students to move, we recommend you upload a new CSV. Jump here to learn how to do this.
If you just have a couple of students to move, you can do this on your Sparx Maths site by following the instructions below.
1. Go to Student Manager under Management on the left of your screen
2. If the students that you want to add to a class are already in a group, use the year and class filter tools at the top left of the screen to find their current class. If the students have not yet been allocated to a class then they will appear in No Class

3. Click the pencil icon next to their name and select which class you wish to move them to.
Or to move multiple students:
1. Tick the student(s) that you want to move to a new class. If you want to move the entire list of students to a new class, use the check box at the top of the list to select all students.
2. Click on Move selected student(s) in the top right and choose To a class. Note that students can only be assigned to one class at a time.
3. Finally, choose the group from the dropdown list presented and click Move Student/s.
Updating multiple students' details or moving them to a new class
If you want to make a lot of changes to student information, the process is very similar to the process for importing new students, with the following exceptions:
- Your CSV import file will need to contain details of existing students. We will only be able to match students in your import file with students in Sparx Maths if you use exactly the same first name, last name and date of birth as we hold for the student in Sparx Maths.
- The fields you can update are: the student's gender; class; year group; email address; and parent/carer email address(es).
- When we show you the preview of your student data, we'll highlight any students that will be updated.
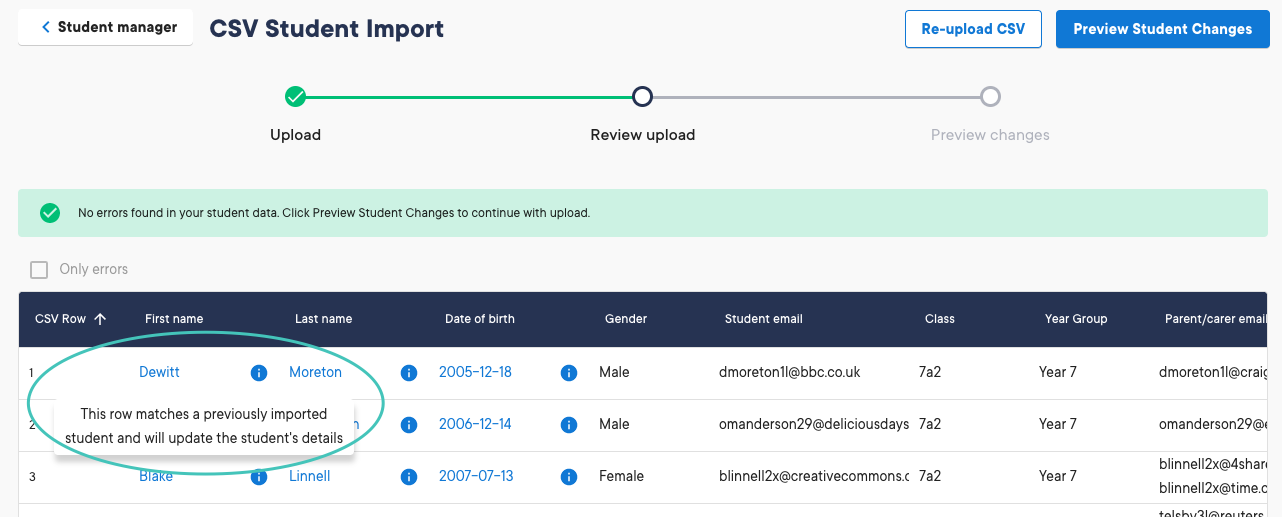

On the import preview screen, we'll show you explicitly what changes we will make to any existing students

You can include both new and existing students in one CSV import file. If you do this, we'll create accounts for the new students and update the accounts of existing students.
Adding Dual Registration students
Dual Registration students are added in the same way as other students, either using the CSV Import or by adding them manually. See above sections for more information on how to do this.
Was this article helpful?